date
Dec 12, 2024
type
Page
status
Published
slug
summary
AI super resolution, in-painting, out-painting.
tags
Tutorial
Teaching
ComfyUI
UCL
category
Knowledge
icon
password
URL
1.Build a Stable Diffusion Upscaler using ComfyUI
Edited from: Guillaume Bieler

As AI tools continue to improve, image upscalers have become a necessary aid for anyone working with images. This tutorial will guide you through how to build your own state of the art image upscaler using Stable Diffusion inside ComfyUI.
In addition to being a lot cheaper to run, this approach offers some key advantages compared to other online options. Mainly, it offers complete control over the workflow, allowing you to tailor the upscaler to your preferred styles and settings. For example, you can use your own checkpoints and LoRAs to steer the upscaler towards specific aesthetics, or add controlnets to the process to increase the level of detail preserved from the starting image.
Before we begin, make sure you have the Ultimate SD Upscale node pack installed. You can install it directly via the ComfyUI manager.

You will also need to download the necessary models to run the workflow:
- You can add the upscaler model to the “ComfyUI/models/upscale_models” folder.
- Any SDXL checkpoint to the “ComfyUI/models/checkpoints” folder. In this case, we use Juggernaut XL
- And finally, add the add detail LoRA for SDXL to “ComfyUI/models/loras”
You can then load the workflow by right click and download bellow json file. 👇
For those of you who are not familiar with ComfyUI, the number of parameters available might seem scary at first. Thankfully, you only need to know how to use a few of them to get the most out of this workflow. I will go through the key ones here:
Load Checkpoint
This is the Stable Diffusion/SDXL model that will perform the upscaling process. We use Juggernault but you can use any SDXL model.

Load LoRA
We use the add detail LoRA to create new details during the generation process. Although we suggest keeping this one to get the best results, you can use any SDXL LoRA. You can also add multiple LoRAs by adding another Load LoRA node if you are aiming for something specific.
The strength_model parameter dictates how impactful the LoRA will be. If you set it at 0 the LoRA will be ignored completely, on the other hand, if you set it at 2 the LoRA will be at it’s strongest.

The CLIP Text Encoder (Prompt)
These two nodes are the positive and the negative prompts. Although, they are not as important for upscaling as for generating images from scratch, having a positive prompt that describes the images can something help get better results.

Load Image
As the name suggests, this is where you upload the image you want to upscale.

You can start with this blurry image:
_with_Cyborganic_buidings_Nikons_Small_World_Photomicrogr.jpg?table=block&id=1752b4bc-a70f-8010-8e32-d3486d177b3d&t=1752b4bc-a70f-8010-8e32-d3486d177b3d&width=512&cache=v2)
Ultimate SD Upscale
This node is where the magic happens and where your image will be uspcaled. The only parameters we suggest modifying are the upscale_by and the denoise.
upscale_by is simply by how much you want to increase the size of your image. It works well with values between 2 and 4, anything higher and the results can start to get a little weird.
The denoise dictates how much creative freedom you want to give the SDXL model and can take any value between 0 and 1. We usually suggest staying between 0.3 and 0.6 for better results.

This workflow works on GPUs with 6GB of VRAM or higher. If you don’t have the right hardware or you want to skip the installation process, you can start using the clarity version of this workflow right away inside the ViewComfy playground.
You can also upload your own upscaler workflow to ViewComfy cloud and access it via a ViewComfy app, an API or the ComfyUI interface.
Here is the result preview if you run everything succefully.

with prompt:
(Satellite image view) of a maximalism bio-cyberpunk city center inside a Micro bio city in pattern of slime mold structures, plan drawing
2.ComfyUI Basic Outpainting Workflow and Tutorial

Outpainting refers to the continuation of content in the edge area of the original image, thereby extending the size of the image. This technique allows us to:
- Expand the field of view of the image
- Supplement the missing parts of the picture
- Adjust the aspect ratio of the image
The principle of outpainting is based on the Stable Diffusion’s inpainting technology, which adds a blank area in the edge area of the image, and then uses the inpainting model to fill the blank area, thereby extending the image.
👇:Download the workflow from bellow link:
Open the above link then right click in the page then click save as..
ComfyUI Outpainting Tutorial Related File Download
ComfyUI Workflow Files
Download Basic Outpainting Workflow
After downloading, drag the workflow file into ComfyUI to use
Stable Diffusion Model Files
This workflow requires the use of special inpainting, you can also use other version of inpainting models:
Model Name | Use | Repository Address | Download Address |
sd-v1-5-inpainting.ckpt | Outpainting | ||
sd-xl-inpainting.safetensors | Outpainting |
After downloading, please place these two model files in the following directory:
Path-to-your-ComfyUI/models/checkpoints
If you want to learn more: How to Install Checkpoints Model If you want to find and use other models: Stable Diffusion Model Resources
ComfyUI Basic Outpainting Workflow Usage
Since the model installation location may be different, find the
Load Checkpoint in the workflow, and then select the model file you downloaded from the model drop-down menu.- Select
v1-5-pruned-emaonly.safetensorsfor the first node
- Select
sd-v1-5-inpainting.ckptfor the second node
Because the second node is a model specifically used for outpainting, the effect of using the model for inpainting will be better, you can test different settings by yourself.
ComfyUI Basic Outpainting Workflow Simple Explanation
This workflow is divided into three main parts:
1.Select the input image for outpainting
- Set the input image

2. Text input Part
- Set positive and negative prompts through
CLIPTextEncode
- Generate the initial image using
KSampler
3. Create Latent Image for Outpainting
- Use the
ImagePadForOutpaintnode to add a blank area around the original image
- The parameters of the node determine in which direction the image will be extended
- At the same time, a corresponding mask will be generated for the subsequent outpainting
4. Outpainting Generation
- Use a dedicated inpainting model for outpainting
- Keep the same prompts as the original image to ensure a consistent style
- Generate the extended area using
KSampler
Instructions for Use
- Adjust the extension area:
- Set the extension pixel values in the four directions in the
ImagePadForOutpaintnode - The number represents the number of pixels to be extended in that direction
- Prompt setting:
- The positive prompt describes the scene and style you want
- The negative prompt helps to avoid unwanted elements
- Model selection:
- Use a regular SD model in the first stage
- It is recommended to use a dedicated inpainting model for the outpainting stage

Notes on ComfyUI Basic Outpainting Workflow
- When outpainting, try to maintain the coherence of the prompts, so that the extended area and the original image can be better integrated
- If the outpainting effect is not ideal, you can:
- Adjust the sampling steps and CFG Scale
- Try different samplers
- Fine-tune the prompts
- Recommended outpainting models:
- sd-v1-5-inpainting.ckpt
- Other dedicated inpainting models
Structure of ComfyUI Basic Outpainting Workflow
The workflow mainly includes the following nodes:
- CheckpointLoaderSimple: Load the model
- CLIPTextEncode: Process the prompts
- EmptyLatentImage: Create the canvas
- KSampler: Image generation
- ImagePadForOutpaint: Create the outpainting area
- VAEEncode/VAEDecode: Encode and decode the image
3.Inpainting With ComfyUI — Basic Workflow & With ControlNet
Edited from Prompting Pixels
Inpainting with ComfyUI isn’t as straightforward as other applications. However, there are a few ways you can approach this problem. In this guide, I’ll be covering a basic inpainting workflow and one that relies on ControlNet.
You can download the workflows here👇
Basic Inpainting Workflow
Inpainting is a blend of the image-to-image and text-to-image processes. We take an existing image (image-to-image), and modify just a portion of it (the mask) within the latent space, then use a textual prompt (text-to-image) to modify and generate a new output.
Here’s a diagram that touches on the noteworthy steps:
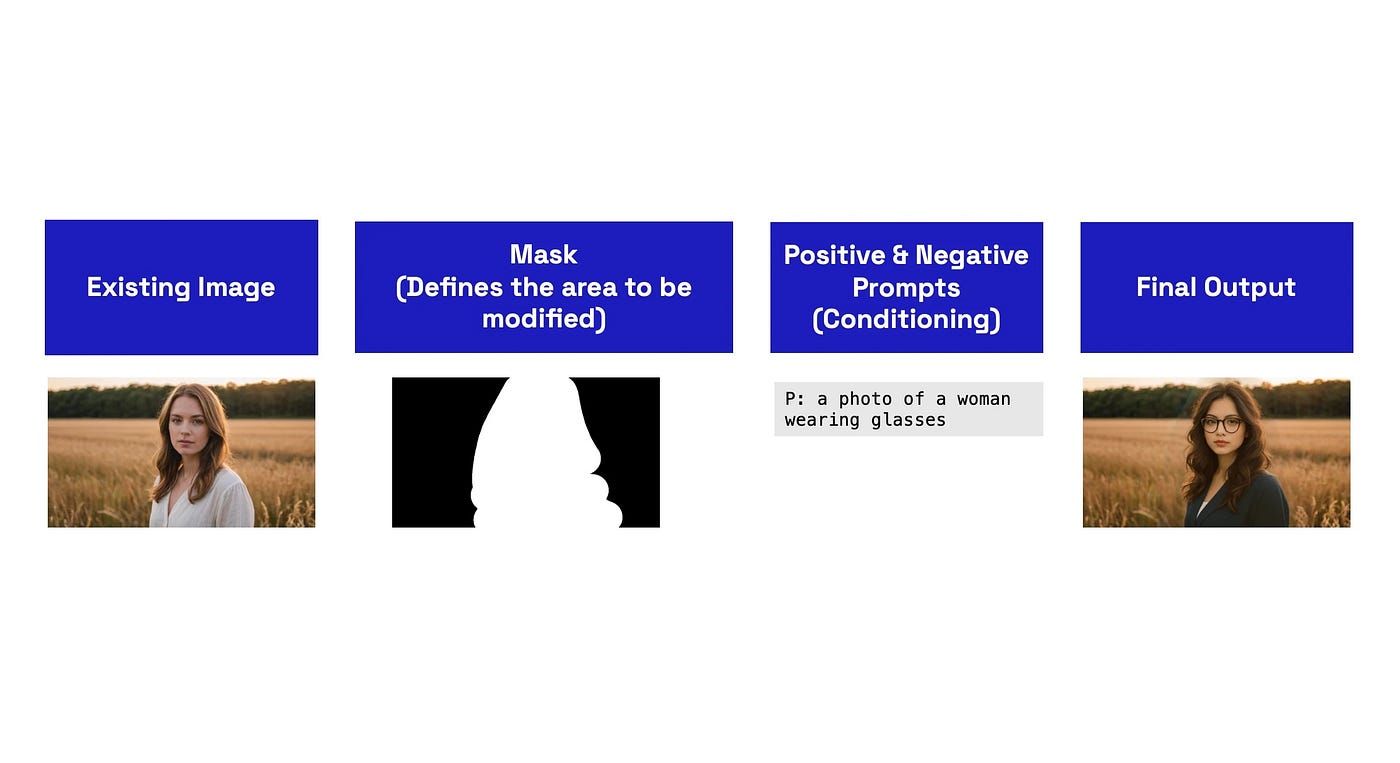
I’ll explain each of these core concepts within the workflow.
Note: You should be using an inpainting model for this process. These models are fundamentally different from standard generation models as they have been trained on partial images.
1. Load Image & MaskEditor
Within the Load Image node in ComfyUI, there is the MaskEditor option:
This provides you with a basic brush that you can use to mask/select the portions of the image you want to modify.
- You could use this image for testing.

- Right click to open the MaskEditor

Once the mask has been set, you’ll just want to click on the
Save option. This creates a copy of the input image into the input/clipspace directory within ComfyUI.
Pro Tip: A mask essentially erases or creates a transparent area in the image (alpha channel). Aside from using MaskEditor, you could upload masked/partially erased images you may have created in other photo editing applications.
2. Encode the Masked Image
The original image, along with the masked portion, must be passed to the
VAE Encode (for Inpainting) node - which can be found in the Add Node > Latent > Inpaint > VAE Encode (for Inpainting) menu.You’ll then pass in the image along with the mask to this node along with the VAE from your model or from a separate VAE:

The
grow_mask_by setting adds padding to the mask to give the model more room to work with and provides better results. You can see the underlying code here. A default value of 6 is good in most instances but can be increased to 64.This node will convert your image and mask into a latent space representation. This allows the model to understand the image and generate a new output based on your textual prompt and KSampler settings.
3. Textual Prompt & KSampler

Your positive and negative textual prompts serve two purposes:
- It generally describes what the image is about (optional but recommended).
- It provides the model with a direction to take when generating the output.
As for the KSampler settings, this will depend on the model being used. So, check the model card for the optimal settings.
As for the denoise within the KSampler, unlike other applications like Automatic1111 WebUI, Forge, etc. a lower denoise level will not retain the original image.
Instead, it will only expose the mask. So keep it at 1.0.
Pro Tip: Using a fixed seed value rather than random is best within the KSampler as you can then replicate or iterate upon the same image and mask. This is especially useful if you are having a hard time getting the prompt or output just right.
4. Decode and Review the Output
Lastly, you’ll just want to decode the image by passing it through the
VAE Decode node and then review or save the output.Here’s our example:
That’s it!

Additional Learning: Inpainting with controlnet


